If you have a blog, you NEED to be on Pinterest as much as need to be on social media. It has such a huge exposure to an audience that not only gets your content in front of the right people, but gets them to click through to your site, re-pin your content, and sign up for your e-mail list if you have an opt-in.
One common myth I like to debunk is that Pinterest is actually a search engine, not a social media platform. It loves keywords, descriptions and images like a search engine, but it also values hashtags used in right way like a social media platform!
If you want to learn how to setup your Pinterest account for your online business step by step then scroll on down!
First, sign up for an account if you don’t have one already.
Make your Pinterest name your brand or company name with your expertise behind it. This will make you show up faster in Pinterest’s search!
If your Pinterest profile is currently personal, change it to a Business account in the Settings.
Your Bio description is limited to 160 characters so make sure you clearly state who you are, who you help and include a link to your opt-in or lead magnet.
Make sure that your cover photos on your profile are your original Pins from your board.
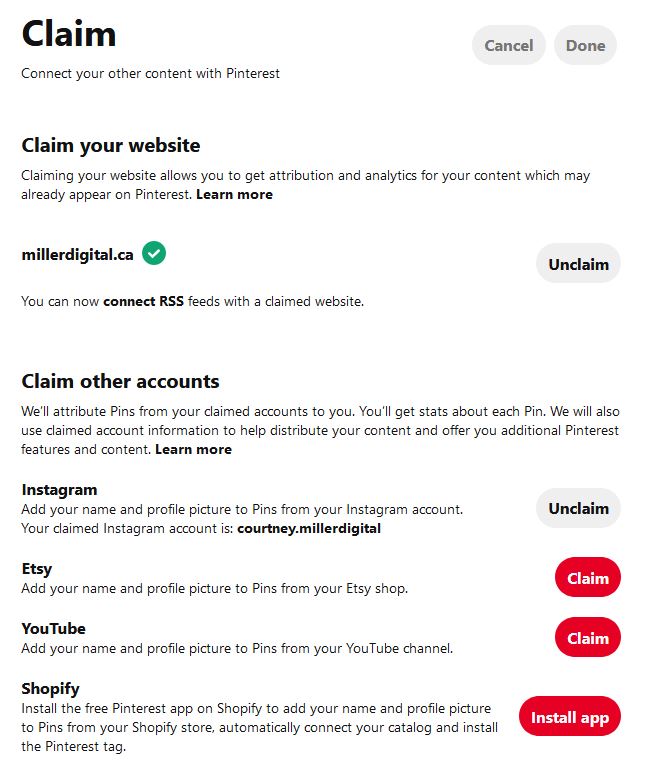
Claim your website and any other social accounts to your Pinterest profile.
2 - Optimize your boards and keywords
Pinterest utilizes keywords the same way SEO keywords work in search engines. You need to have a relevant keyword or key phrase that people would search for in Pinterest. Your board will show up when they search that phrase!
Your boards should be a direct reflection of what you do and what type of content you share. It needs to be LASER focused on your audience’s needs. If you were a beauty blogger, you could have different boards on beauty tips, makeup hacks, makeup tutorials, product reviews, hair styles, beauty looks and more!
In your board description, give an overview about what the board is about and how it can help your audience. Include hashtags relevant to the board topic that people would search for in Pinterest.
Make sure to also edit your board cover photos with the best Pins on your board, including your own.
Also – set any of your personal boards to “Secret”. They won’t show up to your audience but you can still post your personal Pins 🙂
Pppsstt – do you want a template that creates a Social Media Marketing Plan for your online business? Check out my Social Media Marketing Plan Workbook.
3 - Automate your pin schedule
I use and love Tailwind to schedule my Pins. All I have to do is sit down at the beginning of the week for 20 minutes and all 125 Pins for the next 7 days are scheduled. You just Pin, set it and forget it!
Tailwind automatically adjusts your best posting times once you start an account. You can add Tailwind’s suggested Pinning times to your schedule or you can add in your custom scheduled times. Here’s what mine looks like:
When drafting a new Pin in Tailwind or any other automated scheduler, check the following:
URL links directly to your blog post, podcast, video or website
Create 6-8 images for the same post
Title has a keyword description that is relevant to your post
Your Pin is vertical and image is clear
Your Pin description includes a brief summary with relevant keywords and hashtags
Your Pin is posted to the correct Boards
4 - Follow other accounts
There’s a lot of debate about how often you should pin your content vs others. Some say 50/50, 80/20 or 60/40. I personally like to promote other’s work because they will Pin my posts back.
Just like Instagram, you do need to do some engage on the platform. Follow a set number of accounts each week, Pin their content and follow other boards for ideas.
I also use Tailwind Tribes to promote my content and other’s in my niche. It’s an amazing way to expose your Pins and get new eyes to a large number of readers!
Want 30 Day of Content planned out for you for your social media and blog posts? Grab my FREE 30 Day Content Planner.
5 - Create fresh Pins
Your Pins should always be vertical and at least 1000 x 1500 pixels in dimension. You can use a program like Photoshop to design your Pins or Canva’s free templates.
Your Pins should have an attention-grabbing headline, value phrase or infographic for your readers to stop their scroll on. Remember to incorporate your branding colours, logo and fonts into your Pins so people recognize your content!
So what should I Pin?
Because I am always about giving you more CONTENT ideas, here are ideas for your Pins:
– make a Pin for your newest blog post, podcast, or video
– make a Pin for each of your service offerings or products
– make a Pin for any of your social media posts
– make a Pin for your lead magnets/opt-ins
– make a Pin for your About and Contact pages
– make an infographic Pin that summarizes your blog or podcast points
– make a Pin that leads to a sales or shop page
Final thoughts
Make sure to include your Pinterest profile link on your blog or website and tell your audience about the type of content you share, too! You can follow me on Pinterest here.
If you want to learn more about Pinterest or have a personalized Pinning workshop with me, let’s book a chat!